Building a Goat Stanchion from A to Z
Update 28 April 2018
When I wrote this information and posted it to the web several years ago I had no idea the continuing positive response I would get from it. To this day I continue to get questions, comments and thank you emails from people who have built my goat stanchions from all over the world. Its nice to know that in some small way I may have been able to make peoples life a little easier (goats too).
If you would like to see our actual goat stanchions “in action” visit our Milking barn webpage at http://thepossumridgefarms.com/home/the-milking-barn/we post up to date images of our most recent milking activity.
Thanks and enjoy
Our original goat stanchion (made from PVC pipe fittings) was a home school project my daughters built around 20 years ago. It needed a lot of work or replacement to make it usable on a day to day basis. After looking for a good goat stanchion in various catalogs and on the internet I decided to build one from scratch. A really good sturdy goat stanchion can cost upward of 300 dollars. It seemed to me I could build one for much less and with a little ingenuity I might be able to scrounge up most if not all the materials. Yes the one I built is made of wood (most of the ones from the catalogs are made of metal) and will not stand up to a direct hit from a nuclear weapon, but for our small heard of LaMancha dairy goats it has worked out very well. Feel free to change any part of this plan ( fold, spindle or mutilate) no warranty is given or implied. I suggest that if you are one of those people who is accident prone, not comfortable working with basic hand tools, have little or no common sense and or have spent any time as an elected official in our nation’s capital please purchase a stanchion from one of the many fine retailers found in catalogs or online.
Materials Listing
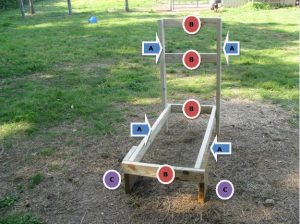
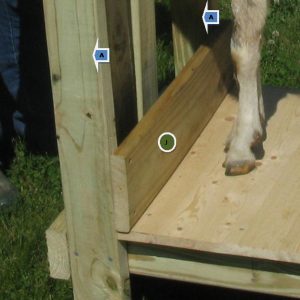
Qty 5 -48 inch 2X4 Front Legs, Table sides and head restraint FIGURE A
Qty 4 – 24 inch 2X4 table support and head restraint supports FIGURE B
Qty 2- 12 inch 2X4/ 2/6 or 2/8 Back Legs FIGURE C
Qty 1 – 21 inch 2X4 table support and head restraint supports FIGURE D
Qty 3- 24 inch 1 X 16 table top OR 3/4 plywood 24 inches wide X 38 inches long FIGURE E
Qty 1- 36 inch 2X4 Head restraint (Static) FIGURE F
Qty 1 box of 2 1/2 wood screws
Qty 1 box of 2 inch wood screws
Qty 2- 10 inch 1X6 feeder box sides FIGURE G
Qty 1- 11 inch 2X6 feeder box front FIGURE H
Qty 1 – 10 inch X 11 inch 3/4 plywood feeder box bottom FIGURE I
Qty 1- 24 inch 1X6 head restraint trim FIGURE J
Qty 1-3/8 bolts, qty 2-3/8 nuts and qty 4-3/8 flat washers
(Pressure treated lumber was used but not necessary as long as you paint the finished product)
 The entire assemble must be screwed together for strength and stability. I suggest a minimum of 2 screws per connection and 3 if possible. To use screws drill a MUCH SMALLER hole then the diameter of the screw into the pieces being connected and tighten the screw until its flush with the wood. DO NOT USE NAILS.
Lay out qty 2 of figure A and qty 3 of figure B and assemble as shown below:
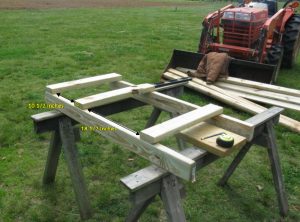
Try and keep the assembly as square as possible.
10 1/2 inches and 18 1/2 inches space between the cross pieces ( See Illustration above)
Attach with 3 screws at each connection
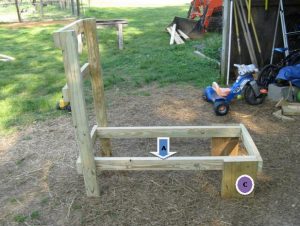
Attach the table sides (FIGURE A) to the rear leg (FIGURE C) with 3 screws
Attach each rear leg and table leg assembly to the front leg assembly as shown with 5 screws on the front and two on each side

Attach the rear cross member (FIGURE B) to the table/ rear leg assembly as shown with 5 screws on each side
At this point your frame is complete
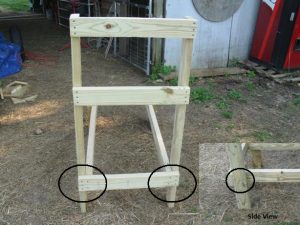
Insert the inner top cross member (FIGURE D) into the frame and attach with 2 screws on each side (See illustration above)
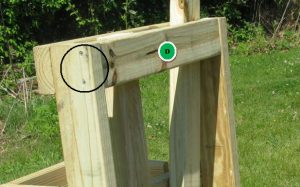
Attach the Static head restraint (FIGURE F) to the front leg assembly as shown
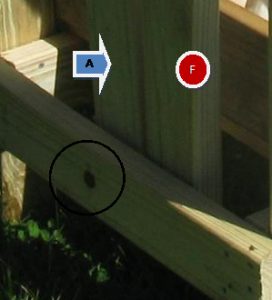
Measure 1/2 inch from the static head restraint (Figure F) and drill and attach the head restraint (FIGURE A) to the front cross member with a 3/8 X 4 inch bolt and nut. Insert 3/8 flat washers between all components and tighten until SNUG but not tight.
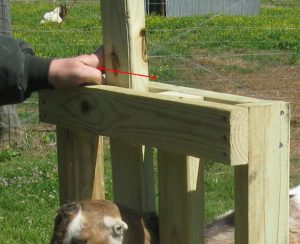
Make sure the head restraint (Figure A) will move back and forth; attach a second 3/8 nut and tighten
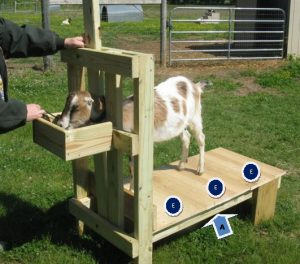
Secure the Table top pieces (Figure E) to the Table Top Frame (Figure A)
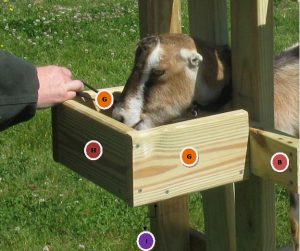
Screw the feeder box front (Figure H) into the feeder box bottom (Figure I). Then attach the feeder box sides (Figure G) to the Feeder box bottom and front assembly as shown above. Attach the complete feeder box assembly to the middle cross member (Figure B).
* The Feeder box is an optional component, some people may want to buy a regular side feeder and bolt it to the middle cross member.
Attach the head restraint trim (Figure J) to the front table leg assembly (Figure A). This component is also optional
Paint the entire assembly as necessary
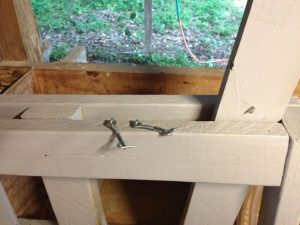
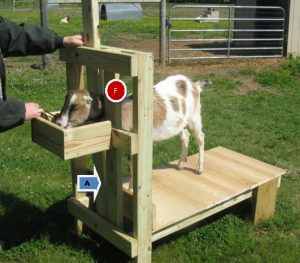
Mounting the head latch was a little harder than you might think. After measuring a couple of goats I decided to mount two latches, one latch was used for the yearlings and the other for the older does. Measure (put a goat in the stanchion and close the head restraint so it is snug but not too tight) and screw the latch pieces in as needed
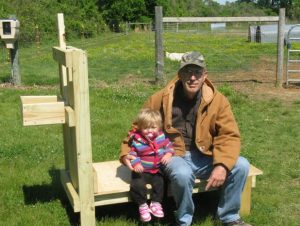
The entire project took about 3 or 4 hours with “assistance” from my 15 month old granddaughter. We have been using this stanchion for about a month and I am very pleased with the results. I would like to thank my wife Julie, my granddaughter Hamish (Zoey), and Dora for her modeling work (A yearling LaMancha doe who is one of the superstars in our LaMancha foundation stock upgrade) for all their assistance and support
If you have any questions please feel free to contact me at possumridgefarms@gmail.com